Announcement

Collapse
No announcement yet.

โมให้ดีกันเยอะแล้ว มาม๊ะ....มาโมให้"เจ๊ง"กันดีกว่า

Collapse
X
 
  • Filter
  • Time
  • Show
Clear All
new posts

  • ถ้าเรารู้ว่า ขาไหนจ่ายเท่าไร (หมายถึงSlot PCI ธรรมดาหรือ ex) จะสามารถเอาไฟนั้นๆมาใช้เลยรึปล่าวเนี่ย แต่กลัวกระแสขับไม่ไหวจริงๆ

    เอ้อ ผมไปดู ซาวบัสเตอร์ ที่ร้าน ฮารดแวร์เฮ้า ตัวไหม่ 98xx โอ้ว

    Comment


    • เค้าห้ามดึงไฟตรงจากSlot PCI ต้องผ่านFuseหรือRหรือLแทน เพื่อป้องกันซาวน์การ์ดมีปัญหา(ช็อท)แล้วไปดึงไฟจากเมนบอร์ดมากเกิน
      ซาวน์การ์ดทุกตัวจะเป็นแบบนี้


      ขับไรไม่ไหว -12vจ่ายได้1A +12vจ่ายได้หลายแอมป์
      ออปแอมป์ตัวนึง ยังไม่ถึง70mAเลย
      Last edited by keang; 18 Jan 2011, 19:45:28.

      Comment


      • มีวิธีที่จะจัีมเพิ่มไฟ......แบบการ์ดจอได้มั๊ยครับ

        Comment


        • ได้ครับ

          - แบบประกันอยู่ครบ ไปพ่วงเอาจากสายไฟชุด +12v, -12v (ชุดไฟเลี้ยง24พิน)
          - แบบหวังผลสูงสุดแต่ประกันไม่เหลือ เปิดฝาซัพพลาย ลากสายตรงจากPCBของซัพพลายเลย
          ถ้าใช้วิธีนี้ ตัวการ์ดต้องทำสายใส่คอนเนคเตอร์เพิ่ม
          Last edited by keang; 18 Jan 2011, 20:06:43.

          Comment


          • - แบบประกันอยู่ครบ ไปพ่วงเอาจากสายไฟชุด +12v, -12v (ชุดไฟเลี้ยง24พิน)

            ขอแบบละเอียดหน่อยได้มั๊ยครับว่าต้องทำอย่างไรบ้าง ความรู้น้อยครับ -*-

            Comment


            • Originally posted by milestone View Post
              - แบบประกันอยู่ครบ ไปพ่วงเอาจากสายไฟชุด +12v, -12v (ชุดไฟเลี้ยง24พิน)

              ขอแบบละเอียดหน่อยได้มั๊ยครับว่าต้องทำอย่างไรบ้าง ความรู้น้อยครับ -*-
              +1

              Comment


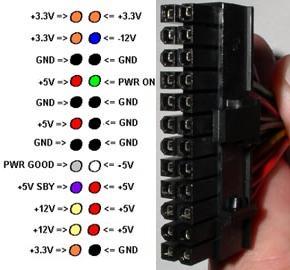
              • พ่วงไฟจากคอนเนคเตอร์ไฟเลี้ยงเมนบอร์ดชุด24พิน
                - ขา10หรือ11 [สีเหลือง] (เลือกเอาแค่1เส้น) สำหรับเป็นไฟเลี้ยง+12v
                - ขา14 [สีน้ำเงิน] สำหรับเป็นไฟเลี้ยง-12v
                เอาไปต่อคอนเนคเตอร์สำหรับจ่ายให้ซาวน์การ์ด


                วิธีพ่วงสายไฟ ก็วิธีเดียวกับที่เค้าเอาตัวCไปใส่ที่สายไฟแบบรูปนี้

                ปอกฉนวนหุ้มสายไฟ ช่วงก่อนเข้าหัว24พิน เอาสายไฟไปพันให้แน่นหรือจะบัดกรีเลยก็ดีจะได้แน่นหนา
                เอาเทฟพันสายไฟหรือจะใช้ท่อหดหุ้มตรงรอยต่อสายไฟ ก็เลือกใช้ได้ตามสะดวก


                ถ้าไม่อยากไปยุ่งกับสายไฟที่ต่อออกจากกล่องซัพพลาย ก็หาสายพ่วงสำหรับเพิ่มความยาวแบบในรูปนี้

                ตัดต่อพ่วงสายไฟจากสายเส้นนี้แทนก็ได้


                แบบนี้พอจะนึกภาพออกป่าว ถ้าติดตรงไหนก็ถามเพิ่มน่ะครับ (แบบว่าไม่มีตัวอย่างของจริงให้ดู ต้องไปค้นรูปในเนทมาใช้แทน)
                หรือไม่ก็ต้องรอคุณmachine_Aถ่ายรูปสายที่เค้าต่อพ่วง มาโพสจะได้เห็นของจริงกัน
                Last edited by keang; 18 Jan 2011, 23:32:47.

                Comment


                • ถ้าต่อ +12 กับ -12 แล้วมันจำเป็นต้องต่อผ่านเรกกูเรเตอร์คุมไฟมั๊ยครับ หรือว่าเข้า C filter แล้วเข้า opamp ได้เลย

                  Comment


                  • ต้องผ่านแน่นอนครับถ้าหวังผลเรื่องเสียง opamp มันค่อนข้องอ่อนไหวเรื่องไฟ พอสมควร ความเห็นผมนะ
                    Originally posted by milestone View Post
                    ถ้าต่อ +12 กับ -12 แล้วมันจำเป็นต้องต่อผ่านเรกกูเรเตอร์คุมไฟมั๊ยครับ หรือว่าเข้า C filter แล้วเข้า opamp ได้เลย

                    Comment


                    • ถ้าพูดถึงเรื่องใช้งานหรือเรื่องคุณภาพ ผ่านหรือไม่ผ่านก็ได้ครับ อยู่ที่เราชอบแบบไหน


                      อธิบายแบบคร่าวๆจะได้ประมาณนี้

                      1. ถ้าใช้ไอซีเรกกูเลเตอร์ จะได้เรื่องระดับแรงดันไฟที่นิ่งขึ้น แต่เสียงจะเปลี่ยนแปลงตามตัวไอซีเรกกูเลเตอร์และรูปแบบวงจรที่เลือกใช้
                      ข้อดี
                      - เป็นการแยกระบบไฟออกจากพาวเวอร์ซัพพลาย ลดการดึงไฟโดยตรงจากซัพพลาย ทำให้ลดอาการไฟไม่นิ่งของตัวพาวเวอร์ซัพพลายได้
                      - หากพาวเวอร์ซัพพลายมีปัญหา เช่น ช็อท จ่ายไฟเกิน จะไม่ส่งผลให้ไอซีออปแอมป์เสียหายได้
                      ข้อด้อย
                      - ไอซีเรกกูเลเตอร์แบบฟิกซ์ค่าคงที่ จะใช้ได้เพียง+-9v เพราะ จะมีไฟที่ดรอปโดยตัวไอซีเรกกูเลเตอร์เองด้วย
                      - ไอซีเรกกูเลเตอร์แบบปรับค่าได้ จะสามารถเลือกใช้ค่าแรงดันได้สูงขึ้นเป็น+-10vถึง+-11v โดยใช้ไอซีเรกกูเลเตอร์แบบLow Dropout
                      - เพิ่มตัวแปรที่ทำให้เสียงเปลี่ยน

                      2. ถ้าต่อตรง จะได้เรื่องไฟเลี้ยงที่สูงกว่า เพราะ ระดับแรงดันไฟยังเป็น+-12vเท่าเดิม
                      ข้อดี
                      - ไฟเลี้ยงที่สูงขึ้นจะช่วยให้ระดับความดังเสียงมีความดังมากขึ้นด้วย
                      - สามารถแยกความแตกต่างของเสียงเบาเสียงดังได้มากขึ้น(Dynamic Range)
                      - ระดับแบคกราวน์น๊อยลดลง(SNR) เพราะ สัญญาณเสียงมีระดับแรงดันสูงขึ้น(แตกต่างจากกราวน์มากขึ้น)
                      - ไม่เพิ่มตัวแปรที่ทำให้เสียงเปลี่ยน
                      ข้อด้อย
                      ถ้าซัพพลายมีปัญหา เช่น ช็อท, จ่ายไฟเกิน อาจมีผลทำให้ไอซีออปแอมป์เสียได้


                      ประเด็นสำคัญ
                      ไม่ว่าจะต่อแบบไหน อย่าลืมว่า เราไปพ่วงไฟจากปลายสายชุด24พินซึ่งเป็นการใช้ไฟร่วมกับเมนบอร์ด ไม่ใช่เป็นการดึงไฟตรงจากตัวซัพพลาย
                      ฉะนั้นจะมีสัญญาณรบกวนจากวงจรส่วนอื่นในระบบเมนบอร์ดติดมาเป็นของแถมด้วย

                      ปรกติในซาวน์การ์ดหรือการ์ดต่างๆจะมีวงจรกรองความถี่สัญญาณรบกวนอยู่ด้วย(คุณภาพดีแค่ไหนก็เป็นอีกเรื่องนึง)

                      ดังนั้น เพื่อระบบไฟที่ดีขึ้น ควรเพิ่มส่วนของฟิลเตอร์เพื่อกรองสัญญาณรบกวน เพื่อกรองขยะในระบบไฟออกไปด้วย

                      Comment


                      • สำหรับการ์ดเสียง opamp หรือ ชิพประมวล ตรงไหนกินไฟมากกว่ากัน
                        ควรไปเพิ่มที่ตรงจุดไหนครับ .....
                        ตั้งใจว่าจะจั๊มหัวแบบสายพัดลม(เค้าเรียกว่าไรไม่รู้)

                        Comment


                        • ชิบประมวลผล หมายถึง ชิบDSPหรือเปล่าครับ
                          ถ้าใช่ตัวนี้กินไฟมากกว่า สังเกตุได้จากภาคจ่ายไฟใช้ไอซีเรกกูเลเตอร์จ่ายกระแสสูง ตัวถังTO-223 จ่ายได้800mA

                          แต่ทั้ง2ตัวใช้โวลท์ไม่เท่ากันน่ะครับ ดูดีๆด้วยว่าของเดิมเค้าดึงไฟกี่โวลท์มาใช้เป็นไฟขาเข้า


                          เรียกหัว"Molex"ครับ คอนเนคเตอร์ในคอมจะเป็นMolexทั้งหมด เค้าเรียกตามยี่ห้อที่เป็นผู้คิดค้นหัวพวกนี้
                          นอกจากบริษัทMolexแล้ว ยังมีบริษัทอื่นผลิตหัวคอนเนคเตอร์แบบเดียวกันมาขายด้วย เช่น AMP(Amphenol)
                          ผู้ผลิตจะใส่หัวยี่ห้อไรมา คนใช้ก็เรียกเป็นหัว"Molex"เหมือนกันหมด
                          Last edited by keang; 19 Jan 2011, 13:51:12.

                          Comment


                          • Comment


                            • The Sheffield-XLO ชุด Test & Burn-in CD

                              ยืมรูปจากเวป

                              ปกหน้าจะเป็นหนังสือเล่มเล็กๆมีทั้งหมด18หน้า ภายในจะบอกรายละเอียดว่าแต่ละแทร็คคืออะไร ใช้ทำอะไร ใช้ยังงัย


                              SHEFFIELD/XLO TEST AND BURN-IN CD
                              Technical Notes by Roger Skoff


                              • TRACK 1: Channel Identification and Channel Balance (0:34)

                              Channel Identification. For System setup. Allowsyou to varify tha tyour System's Right and Left Channels are positioned properly, and not reversed. Channel reversal, either from a single source or from all sources (CD, LP, Tuner, etc.) can easily come about as the result of mistakenly plugging just ONE pair of cables into your System in reersed order (Left-channel plug into Right-channel jack, and vice versa). This sort of problem is most common in cases where new equipment is added to an existing System, old equipment is removed and replaced, or , as for A-B comparisons, equipment is temporarily plugged into the System and then removed. Alway check for channel reversal if you have been making changes to your System.

                              Channel Balance. Particularly for recordings made using a "coincident" microphone technique (which eliminates phase differences at the microphone position), having your System's channels precisely in balance is crucial to correct imaging and spatial representation. This mono channel balance test provides phase-correct AMPLITUDE ONLY information to enable you to achieve near-perfect channel balance "by ear".


                              ---------------------------------------------


                              • TRACK 2: Relative Phase Test (0:39)

                              AN "INPHASE / OUT OF PHASE" RECORDING OF THIS TYPE IS THE VERY BEST TOOL YOU CAN USE TO MAKE SURE YOUR SPEAKERS ARE PROPERLY WIRED AND PROPERILY PLACED. IT CAN EVEN HELP YOU TO IMPROVE THE ACOUSTICS OF YOUR LISTENING ROOM!

                              A. Properly Wired
                              As applied to loudspeakers, the term "Relative Phase" refers to the movement of the Speaker system's driver elements (usually cones, domes, panel or ribbons) in response to a signal of known polarity. If the elements of both the Left and Right loudspeakers move IN THE SAME DIRECTION [forward] for a given [positive] signal, and do so at the same time, the speakers are IN correct relative phase. If they move in OPPOSITE directions (one forward, one back), they OUT OF correct relative phase.

                              The result of speakers being out of relative phase is that imaging specificity is lost and, because the Right and Left channel woofers at least partially cancel each other, bass energy and volume are greatly reduced. If this is NOT what you hear when you play the OUT OF PHASE section of this track; if, instead, you find that the OUT OF PHASE section images BETTER than the IN PHASE section, or that Roger Skoff's voice has more bass content OUT OF PHASE than it does IN PHASE, that's something wrong with your System, and the odds are that ONE of your loudspeakers is wired incorrectly.

                              To fix it, check you speaker cables at both their amplifier and loudspeaker ends. When you find the end has its leads hook-up POSITIVE to NEGATIVE and NEGATIVE to POSITIVE, instead of POSITIVE to POSITIVE and NEGATIVE to NEGATIVE as they should be, just re-make those connections, and your problem will disappear.

                              B. Properly Placed
                              The cancellations that result from an "out-of-relative-phase" condition can help you "dial-in" the positioning of your loudspeaker easily and precisely.

                              WHEN PLAYING IDENTICAL OUT OF PHASE SIGNALS, PERFECTLY MATCHED LOUDSPEAKERS, PERFECTLY PLACED, IN A PERFECT LISTENING ROOM, WILL PERFECTLY CANCEL ALL OF THE SONIC INFORMATION WHICH WOULD NORMALLY APPEAR TO COME DIRECTLY FROM THE SPEAKERS, OR FROM BEHIND OR BETWEEN THEM. THE ONLY SOUND THAT WILL BE HEARD WILL BE FROM UNCANDELLED ENERGY REACHING THE LISTENER INDIRECTLY ASS WALL, CEILING, OR FLOOR REFECTIONS, AND THIS WILL SEEM TO HAVE NO APPARENT SOURCE.

                              Although none of the above "Perfects" may actually be possible to achieve in the real world, it IS possible to come close, and by doing so, you will GREATLY improve your System's soundstage, imaging and focus.

                              Start by positioning your speakers as well as you can "by ear" and by using the appropriate other tracks on this CD. Then, after making sure that the channels are balanced correctly, sit exactly in the "sweet spot" (usually dead center, between your speakers), and play the OUT OF PHASE section of this track. Listen carefully: Where does the voice sound like it's coming from? If it seems to have a definite source, move ONLY the speaker nearer to the apparent source a SMALL DISTANCE (less than an inch may be sufficient) farther away from you. What does that do to the sound when you play the track again? Keep repeating the process, moving your speakers ONE AT A TIME, IN SMALL INCREMENTS, forard, backward, and to the sides, untill you have gotten as close as you can to the ideal no-image "sourceless" sound. Then change your listening position to slightly one side of the sweet spot, and start all over again. When you've gotten the greatest cnacellation possible at the broadest possible range of listening positions, you're finished! Put on one of this CDs Sheffild Lab Audiophile Reference Series music tracks, and prepare to have your socks knocked off!

                              C. Improveing Listening Room Acoustics
                              After you have canceled as much as possoble of the direct sound from your speakers, a substantial part of the sound that remains will be the result of room reflections.

                              These reflections can be caused by any acoustically hard surface, including walls, uncarpated floors, untreated cellings, windows glass, mirrors, pictures, and even some furniture, and can come from anywhere at all in the room -- above, below, to in the sides of, or even behind your listening position.

                              Alyjough a certain amount of "liveness" is to be desired in a good listening room, coherent reflections reaching the listening position can only hurt imaging and diminish the quality of spatial representation. To eliminate them, the first step is to FIND them, and that's how this track can help.

                              Seated in your normal position, play the OUT OF PHASE portion of this track and listen carefully to locate the sources of reflectioned sound. These are the acoustical "problem spots" in your room, and once you're identified them, you can apply whatever acioustical treament may be necessary. Remember, though, that every time you make an acoustical change, You MUST re-Check the placement of your speakers for optimum cancellation.


                              ---------------------------------------------


                              TRACK 3: " walkaround" (2:58)

                              This track was recorded in a "live" room, 32 feet long, by 18 feet wide, with a 13 foot ceiling. A closely matched pair of classic AKG C24 vacuum tube stereo microphones was used, in matrixed array, and, if your System can reproduce it, you will find that the spatial respretation is simply phenomenal!

                              That the point of this track -- to see exactly how well your system can reproduce spaces.

                              Doug Sax walks around the room with a pair of claves (wooden "click sticks"), talking and clicking the claves. As he moves, he tells exactly where he is in relation to the microphones. When he finally stops in the center of the room (about 6' from the microphones), he joined by Roger Skoff (about 8' further back), and they both start talking at the same time!

                              Not only does this track give you a verifiable check of your System's ability to image and accurately reproduce a soundstage, unraveling the two voices and BEING ABLE TO UNDERSTAND WHAT BOTH ARE SAYING constitutes a supreme test of its resolution and clearity!


                              แผ่นนี้ เป็นการร่วมมือของ ผู้ผลิตระบบสาย กับ ผู้ผลิตแผ่น
                              สายเชื่อมต่อในระบบเป็นของXLOทั้งหมด เป็นการร่วมมือที่ประสบความสำเร็จมาก
                              หลังจากชุดนี้วางขาย ผู้ผลิตรายอื่นก็มีการทำแผ่นทดสอบลักษณะนี้ออกมาหลายเจ้า


                              แผ่นนี้ผลิตนานมากแล้ว ส่วนใหญ่คนจะไม่ได้สนใจดูรายละเอียดเนื้อหาในปกหน้ากัน ได้แผ่นก็เปิดฟังเปิดลองกันเลย
                              ( เมื่อไม่ได้อ่านรายละเอียด ทำให้พลาดเรื่องดีๆไปเยอะมาก )

                              เปิดแทร็ค1 อ๋อ เห็นละ มีซ้ายมีขวามีตรงกลาง พอจบก็ไปแทร็ค2ต่อ อ๋อเสียงแบบนี้ถูกเฟสเสียงแบบนี้กลับเฟส แล้วก็ไปแทร็คอื่นต่อ

                              แต่ถ้าหากเปิดและทำความเข้าใจดูสักนิด จะรู้ว่ามีไรมากกว่าที่คิดเยอะ
                              แค่แทร็ค3แทร็คแรก ก็สามารถใช้ตรวจสอบใช้เซ็ทระบบได้แล้ว
                              Last edited by keang; 19 Jan 2011, 15:24:57.

                              Comment


                              • DAC ผมกลายเป็นแบบนี้แล้วไม่หล่อเลย


                                เจาะ in put หน้าเครื่องละ แอมป์ในเคสผม ^^

                                Comment

                                Working...
                                X