 Tweet
Tweet
น่าทำเล่นบ้างจัง
-
-
เป็นอะไรที่ชอบมากเลย ของผมก็ทำใช้เองทั้งหมดเลยครับ เป็น 5.1
แอมป์ LM3886 4ช่อง แล้วก็ TDA7294bridge อีก2ช่อง ใช้LM3886ขับคู่หน้ากับคู่หลัง ส่วนTDA7294ขับซับกับเซนเตอร์ ใช้ dts decoder ถอดรหัส5.1 จาก xtreamer
ตู้ลำโพงก็ทำเองทั้งหมดยกเว้นเซนเตอร์ใช้ของJBLComment
-
จัดไปหนึ่งเพลงครับ ถ่ายจากมือถือนะครับ วีดีโออาจจะไม่จัด เสียงสูงเสียงกลางไมค์จับไม่ได้ แต่เบสไม่ต้องพูดถึงครับ
เสียงเบสที่บันทึกจากกล้องไกล้เคียงเสียงจริงครับ ลองฟังครับ

Comment
-
ตัดสติคเกอร์+กัดPCBได้คมจริงๆ


Comment
-
รู้สึกว่าพี่แกจะมีเครื่องปริ้นสติ๊กเกอร์นะ เอ....หรือว่าเครื่องปริ้นท์ทั่วๆไปมันก็ปริ้นท์ได้แค่เปลี่ยนกระดาษ แต่ผมไม่รู้ เวลาปริ้นท์
ผมจะปริ้นท์ลงกระดาษแล้วเอาไปทาบกับแผ่น PCB ที่ติดสติ๊กเกอร์เปล่าๆใว้ ทำให้เวลาตัด ต้องตัดให้ทะลุทั้ง กระดาษทั้งสติ๊กเกอร์
อ้อ...ยังมีเทปสองหน้าที่ต้องแปะเอาใว้ระหว่างสติ๊กเกอร์กับ กระดาษอีก เท่ากับต้องตัดให้ทะลุสามชั้นช่วยบอกวิธีปริ้นท์สติ๊กเกอร์
หน่อยได้มั้ยครับComment
-
เข้....น่า ชช ใส่ซัก 2-3 ทีComment
-
เครื่องปริ๊นทั่วไปก็ปริ๊นได้นะครับ ซื้อกระดาษปริ๊นรูปที่เป็นแบบสติ๊กเกอร์ขนาด A4 มาก็ปริ๊นได้เลยครับ ส่วนผมใช้ EPSON TX111 ครับ
ประมาณนี้ครับ แล้วก็ตัดไปแปะกับแผ่นปริ๊นได้เลยครับ
 Last edited by one; 26 Sep 2011, 11:56:05.
Comment
-
ด้วยความไม่รู้ของผมเมื่อก่อน ผมเอาสติ๊กเกอร์ ใส่ไปในเครื่องปริ๊นท์แล้วก็ลองปริ้นท์ดู ปรากฎว่าได้ครับ
แต่โดนมือจะลบทันที เลยคิดเอาเองว่าเครื่องปริ้นท์ต้องเป็นแบบเลเซอร์(มั้ง) ตอนนี้เข้าใจแล้วครับ
ขอบคุณมากมีคนหันมา DIY กันเยอะๆแบบนี้สงสัยจะได้มีห้องย่อยแน่ๆเลย อิๆ ^^Comment
-
มีพวกเดียวกันเเล้ว เเต่ผมทำ transistor 50w ไฟเท่ากันComment
-
เมื่อก่อนผมก็เล่นทรานซิสเตอร์ครับ ซื้อแผ่นปริ๊นสำเร็จมาประกอบเอง ไฟ +/- 40Vdc หม้อแปลง 7A น่าจะได้อยู่ราวๆ 70-80WOriginally posted by AS5HOLE View Post
ตัวนี้แหละครับ

Comment
-
แล้วก็ซื้อวงจรสำเร็จมาว่าจะประกอบ PA เล่น ซื้อมาเมื่อสักเกือบ 10 ปี้แล้ว จนถึงทุกวันนี้ก็ยังไม่ได้ประกอบ

หม้อแปลง 50-0-50 Vac ขนาด 6A อยู่ 2 ลูกครับ สั่งพันจากเทคนิคอะไหล่เมื่อ 8 ปีที่แล้ว ของใหม่นะครับ
วางทิ้งเอาไว้จนลืม สนิมขึ้นเลย ตอนนั้นว่าจะเอามาประกอบแอมป์ 200วัตต์ บอร์ดไดร์ ACTOR AT-260 ตามรูปครับ
ตอนนี้ก็วางไว้จนฝุ่นเกาะ จนแล้วจนเล่าก็ยังไม่ได้ทำ

ทุกวันนี้ไม่ชอบเสียงดังๆแล้วครับ ฟังแล้วเครียด หันมาฟังแอมป์ IC เสียงใสๆ คลายเครียดดีกว่าครับComment
-
เรื่องความคนชัดจัดจ้านต้องยกให้พวก LM3886/LM3875 เค้าเลยรายละเอียดจะดีมากๆ 7294 ผมว่า เสียงออกแนวฟังสบายๆ
แต่ถ้าฟังเรื่องๆ แบบเปิดทั้งวันทั้งคืน ต้อง ทรานซิสเตอร์ครับ (ความเห็นส่วนบุคคล)Comment
-
เพิ่งรู้น่ะเนี่ย สมพรร้ายวุ้ย สั่งโรงงานผลิตC สกรีนเป็นยี่ห้อตัวเองเลย
TDA7294 Bridge เอามาจากเวปรัสเซีย (ตรงกับวงจรในดาต้าชีทหน้า13)
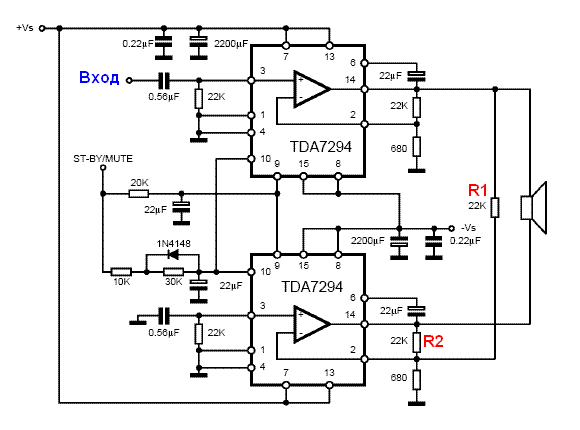
A few tips to improve sound quality, reliability and stability :
1. Resistors R1 and R2 should be as much as possible the same resistance.
2. In the food chain instead of the 0.22 F capacitor is best to use capacitors of at least 1 uF. Moreover, electroless (eg film K73-17).
3. Voltage capacitors in the power circuit of 50 volts to 63 volts and the electrolyte for film.
4. All 22 uF capacitors to replace a 47 uF ... 100 x 50 (to 4 pieces). It is possible and a larger capacity, but the difference is very small.
5. The capacity of the lower scheme of the capacitor 0.56 uF (connected to pin 3 the lower chips) possible increase (but not to an electrolytic). "Bad" Ceramic is better not to use, but expensive "audiophile" set is absolutely not necessary.
6. In parallel, electrolytes, connected between pin 6 and 14 to connect the chip film capacitors at least .68 uF.
7. If the amplifier is designed for a subwoofer, the capacity of input capacitor must be increased to 1 uF.
8. Printed conductors power to make a minimum length and maximum width.
9. The output of each of the chips on the ground to put a chain consisting of a resistor connected in series 8.2 ohm 0.5 watts, and a capacitor 0.1 uF for a voltage not less than 35 volts.
ดูเป็นแนวทางน่ะ ใครจะเอาไปใช้ก็เอาไปดัดแปลงให้เหมาะสมกับวงจรที่ใช้อยู่
รูปอธิบาย > เหตุใด "ต่อแบบBridge" แล้วได้เอ้าท์พุทสูงขึ้น

ต่อแบบปรกติใช้ไอซี1ตัว ไฟเลี้ยง = +-26v
ต่อแบบBridge ใช้ไอซี2ตัว ไฟเลี้ยง = (+-26v) + (+-26v) = +-52v ( เอ้าทพุทสวิงได้สูงขึ้นอีก1เท่าตัว )

In a conventional amplifier, one end of the load "attached" to the ground. And the load voltage is equal to the output voltage amplifier (amp "rocking" loading "only for one-way", ie not much).
In bridged mode adds another exactly the x power, but running in opposite to the first: when the first output "+", the second output voltage is exactly the same, only with the sign "-" and vice versa. Load to the ground is not connected (if you connect the - short-circuit is provided!), And is connected between the outputs of both amplifiers. Therefore, compared with a single amplifier, which "shakes" load "on one side only" bridge "shaking" it "from both sides in opposite directions".
The diagram on the right at one end of the load to ground voltage volts 26 and -26 volts on the other also with respect to ground. So between the two ends of the load voltage (it is equal to the voltage difference at its ends) Unagr = 26 - (-26) = 26 + 26 = 52 volts.
อันนี้แบบBridge ใช้ฐานวงจรเดิมใกล้เคียงที่คุณoneทำ
( วงจรที่อยู่หน้าC3 = วงจร Active Crossover for Sub-Woofer )

เผื่อใครไฟแรงเล่นฮาดไวร์
 Last edited by keang; 26 Sep 2011, 16:37:06.
Comment
-
ชอบลายปริ้นท์ครับ สวยดีจัง
ของผมไม่มีปรินทร์ ต่อสดเลย แต่เป็น LM 3886
7294 เห็นไพศาลบ้านหม้อ ขายตัวราวๆครึ่งร้อยครับ ใส่กล่องรวมๆกัน อ่านกระทู้นี้แล้วน่าเล่นจริงๆComment
-
ตอนนี้กำลังทำลายปริ๊น LM3886 ครับ เอามาไห้ดูแค่เป็นน้ำจิ่มก่อน เดี๋ยวขึ้นกระทู้ใหม่ครับ
แกะลายแล้ว

นำมากัด

Comment

Comment